HOW TO RESCHEDULE YOUR USCIS BIOMETRICS APPOINTMENT
Your biometrics appointment is for you USCIS to collect your fingerprints and a photograph of you for running security clearances and checking your identity and criminal record. Your biometrics appointment notice will arrive on USCIS Form I-797C with a location of a biometrics service center as well as a date and time for you to attend. You should bring that appointment notice and a passport or State ID to your appointment.
The day of your appointment they will stamp your appointment notice to show that you attended and had your biometrics done. You should make sure to hold onto the stamped copy of your notice once you attend so you can show that you complied with the requirements.
USCIS has begun accepting online requests to reschedule a biometrics appointment. If you need to reschedule your biometrics (fingerprint) appointment then you can go to the USCIS website and request a new date.
Sufficient reasons for rescheduling your biometrics appointment may include, but are not limited to:
Illness, medical appointment, or hospitalization;
Previously planned travel;
Significant life events such as a wedding, funeral, or graduation ceremony;
Inability to obtain transportation to the appointment location;
Inability to obtain leave from employment or caregiver responsibilities; and
Late delivered or undelivered biometric services appointment notice.
USCIS only accepts untimely rescheduling requests made to the USCIS Contact Centerand does not accept untimely requests to reschedule by mail or in-person at a USCIS office or through the myUSCIS online rescheduling tool.
Online
Through myUSCIS (best way)
To reschedule your appointment using the online tool you should log-in to your myUSCIS account online and follow the instructions. This is the best way to reschedule.
USCIS Virtual Assistant
You can speak with the USCIS virtual assistant (Emma) and ask that your biometrics appointment be rescheduled.
By Phone
Call the USCIS Contact Center at 800-375-5283 (TTY 800-767-1833) from Monday to Friday, 8 am to 8pm Eastern time. Provide the customer service representative with your:
Name
Birth date
Address
Case number
The Contact Center representative will create a request to reschedule your interview in the system. It can take several weeks to process the request.
If You Already Missed your Appointment
If you already missed your appointment you should contact USCIS right away. Inform them that you missed your appointment and you need a new appointment to get your biometrics done.
If you miss your biometrics appointment without having rescheduled it, and it is still within a week or two of your scheduled appointment date, you can try going to the same location at the same time and showing your appointment letter. They will sometimes allow you to get your biometrics done late if you are within a few days of that appointment date. There is no guarantee that they will and you should not expect them to, but they have allowed it in the past and sometimes when USCIS will instruct you to attend your appointment another day that week when you call to inform them that you missed your appointment.
Do not send original documents unless specifically requested.
TRANSLATIONS:If you submit any documents (copies or original documents, if requested) in a foreign language, you must include a full English translation along with a certification from the translator verifying that the translation is complete and accurate, and that the translator is competent to translate from the foreign language to English.
Required Documents For All Applicants:
🗹 A copy of your Permanent Resident Card (or copy of Form I-90 filing receipt if you lost your resident card);
🗹 Photocopy of the applicant’s current legal marital status document, if applicable (e.g.; marriage certificate, divorce, annulment decree, or death certificate of former spouse);
🗹 A money order payable to “U.S. Department of Homeland Security” for current filing fee and biometric fee ($725 as of September 2023).
Applicants 75 years of age or older are exempted from the biometrics services fee.
If you are applying for naturalization on the basis of marriage to a U.S. citizen, send the following 4 items:
🗹 1. Evidence that your spouse has been a U.S. citizen for the last 3 years: a. Birth certificate (if your spouse never lost citizenship since birth); or b. Certificate of Naturalization; or c. Certificate of Citizenship; or d. The inside of the front cover and signature page of your spouse’s current U.S. passport; or e. Form FS-240, Report of Birth Abroad of a Citizen of the United States of America; and
🗹 2. Your current marriage certificate; and
🗹 3. Proof of termination of all prior marriages of your spouse (divorce decree(s), annulment(s), or death certificate(s)); and
🗹 4. Documents referring to you and your spouse:
a. Tax returns, bank accounts, leases, mortgages, or birth certificates of children; or
b. Internal Revenue Service (IRS)-certified copies of the income tax forms that you both filed for the past 3 years; or
c. An IRS tax return transcript for the last 3 years.
If You Are Outside the U.S.:
🗹 Two passport-style photographs
If Applying Based on Military Service:
🗹 A copy of your official military orders;
🗹 DD Form 214, NGB Form 22, or discharge orders (if separated from service);
🗹 Form N-426, Request for Certification of Military or Naval Service;
If You Are Applying Under INA 319(b):
Evidence of your citizen spouse’s employment abroad (if applying under INA 319(b))
USCIS requires that you provide photographs of yourself with your visa petition or with certain immigration benefit applications (asylum, adjustment of status, employment authorization, and others). Below are USCIS’ requirements for the “passport-style photographs” that must be sent with petitions/applications that require photos. These photos are required for the DV lottery (diversity visa lottery), Adjustment of Status (green card) Application, all visa applications, U.S. passports, and other immigration benefits.
The below guidance was taken directly from USCIS and the U.S. Department of State, however, the acceptance of your digital images or photos is at the discretion of USCIS, or if you are consular processing then with the U.S. embassy or consulate where you apply.
We recommend you use a professional visa/passport photo service to ensure your photo meets all the requirements.This service is offered at most drug store chains like CVS, Duane Reade, Rite Aid, Walgreens , etc.
The U.S. Government provides this tool free of charge. You can take the photo of yourself and then upload your photo and use the tool to crop and resize your image to the proper dimensions. Find the photo tool here https://tsg.phototool.state.gov/photo.
Photo Tips
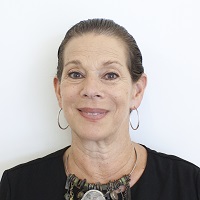
Submit one color photo, taken in last 6 months.
Use a clear image of your face. Do not use filters commonly used on social media.
Have someone else take your photo. No selfies.
Take off your eyeglasses for your photo.
Use a white or off-white background without shadows, texture, or lines.
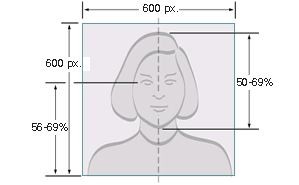
Sized such that the head is between 1 inch and 1 3/8 inches (22 mm and 35 mm) or 50% and 69% of the image’s total height from the bottom of the chin to the top of the head. View the Photo Composition Template for more size requirement details.
Taken within the last 6 months to reflect your current appearance
Taken in front of a plain white or off-white background
Taken in full-face view directly facing the camera
With a neutral facial expression and both eyes open
Taken in clothing that you normally wear on a daily basis
Uniforms should not be worn in your photo, except religious clothing that is worn daily.
Do not wear a hat or head covering that obscures the hair or hairline, unless worn daily for a religious purpose (See USCIS Policy for Accommodating Religious Beliefs). Your full face must be visible, and the head covering must not cast any shadows on your face.
Headphones, wireless hands-free devices, or similar items are not acceptable in your photo.
Eyeglasses are no longer allowed in new visa photos, except in rare circumstances when eyeglasses cannot be removed for medical reasons; e.g., the applicant has recently had ocular surgery and the eyeglasses are necessary to protect the applicant’s eyes. A medical statement signed by a medical professional/health practitioner must be provided in these cases. If the eyeglasses are accepted for medical reasons:
The frames of the eyeglasses must not cover the eye(s).
There must not be glare on eyeglasses that obscures the eye(s).
There must not be shadows or refraction from the eyeglasses that obscures the eye(s).
If you normally wear a hearing device or similar articles, they may be worn in your photo.
Snapshots, magazine photos, low quality vending machine or mobile phone photos, and full-length photographs are not acceptable.
Applicants using Form DS-260 (Consular Processing)
If you are applying for an immigrant visa, using Form DS-260, you must provide two (2) identical photos at your immigrant visa interview. Your photos must be: 2 x 2 inches (51 x 51 mm) in size Printed on photo quality paper.
TAKING THE PHOTO YOURSELF
Photo presents the full head from the top of the hair to the bottom of the chin
Head is in the center of the frame
Face has a neutral expression and is facing the camera straight on
Paper Photo Head Size Template
Photo 2” inches by 2 “
The height of the head (top of hair to bottom of chin) should measure 1” to 1” (25 mm – 35 mm)
Make sure the eye height is between 1 ⅛” to 1 ⅜” (28 mm – 35 mm) from the bottom of the photo
Digital Image Head Size Template
The top of the head, including the hair, to the bottom of the chin must be between 50% and 69% of the image’s total height. The eye height (measured from the bottom of the image to the level of the eyes) should be between 56% and 69% of the image’s height.
Image pixel dimensions must be in a square aspect ratio (meaning the height must be equal to the width). Minimum acceptable dimensions are 600 pixels (width) x 600 pixels (height). Maximum acceptable dimensions are 1200 pixels (width) x 1200 pixels (height).
The digital image must adhere to the following specifications:
Dimensions
The image dimensions must be in a square aspect ratio (the height must be equal to the width). Minimum acceptable dimensions are 600 x 600 pixels. Maximum acceptable dimensions are 1200 x 1200 pixels. Please review photo requirements for specific dimensions.
Color
The image must be in color (24 bits per pixel) in sRGB color space which is the common output for most digital cameras.
File Format
The image must be in JPEG file format
File Size
The image must be less than or equal to 240 kB (kilobytes).
Compression
The image may need to be compressed in order for it to be under the maximum file size. The compression ratio should be less than or equal to 20:1.
Taking Photos Of Your Baby Or Toddler
When taking a photo of your baby or toddler, no other person should be in the photo, and your child should be looking at the camera with his or her eyes open.
Tip 1:
Lay your baby on his or her back on a plain white or off-white sheet. This will ensure your baby’s head is supported and provide a plain background for the photo. Make certain there are no shadows on your baby’s face, especially if you take a picture from above with the baby lying down.
Tip 2:
Cover a car seat with a plain white or off-white sheet and take a picture of your child in the car seat. This will also ensure your baby’s head is supported
Change of Appearance
If your photo(s) or digital image does not reflect your current appearance, even if it is not older than 6 months, the U.S. embassy or consulate will request that you provide a new photo with your application.
Applicants will be requested to obtain a new photo if they have:
Undergone significant facial surgery or trauma
Added or removed numerous/large facial piercings or tattoos
Undergone a significant amount of weight loss or gain
Made a gender transition
Generally, if you can still be identified from the photo in your visa application, you will not need to submit a new photo. For example, growing a beard or coloring your hair would not generally be considered a significant change of appearance.
If the appearance of your child under the age of 16 has changed due to the normal aging process, he or she will generally not have to provide a new photo. However, the acceptance of your photo or digital image is at the discretion of the U.S. embassy or consulate where you apply.
Additional Requirements for Nonimmigrant Visas
Applicants using Form DS-160 or Form DS-1648
If you are applying for a nonimmigrant visa by filling out the DS-160 or DS-1648 online form, the form will instruct you to upload your digital image as part of completing the online visa application form. Review the Digital Image Requirements, which also provide additional requirements if you are scanning an existing photo.
Some embassies and consulates require visa applicants to bring one (1) photo, which meets requirements, to the interview. Review the embassy or consulate instructions where you will apply to learn more.
Additional Requirements for the Diversity Visa (DV) Program
Diversity Visa Program Entrants
If you are entering the Diversity Visa (DV) Program online, you must upload your digital image as part of your entry. Your digital image must be:
In JPEG (.jpg) file format
Equal to or less than 240 kB (kilobytes) in file size
In a square aspect ratio (height must equal width)
600×600 pixels in dimension
Do you want to scan an existing photo? In addition to the digital image requirements, your existing photo must be:
2 x 2 inches (51 x 51 mm) scanned at 300 pixels per inch (12 pixels per millimeter)
Diversity Visa Program Selectees
Each DV applicant will need to bring two (2) identical photos to the interview. Your photos must be:
2 x 2 inches (51 x 51 mm) in size printed on photo quality paper.
The Freedom of Information Act5 U.S.C. § 552, is the United States’ federal law that requires the full or partial disclosure of previously unreleased or uncirculated information and documents controlled by the U.S. Federal Government upon request [full text of 5 U.S.C.§552]. The act defines agency records subject to disclosure, outlines mandatory disclosure procedures, and includes nine exemptions that define categories of information not subject to disclosure. The act was intended to make U.S. government agencies’ functions more transparent so that the American public could more easily identify problems in government functioning and put pressure on Congress, agency officials, and the president to address them. The FOIA has been changed repeatedly by both the legislative and executive branches.
In the context of immigration law FOIA requests are a powerful and commonly used tool since it allows for immigrants to get a copy of their immigration file and the records the government has on them. This is done sometimes because immigrants lost documents or they had a lawyer that never gave them the documents, or sometimes to see if there are records of them being stopped years ago, and if so, to find out what exactly happened during that prior encounter with immigration since often the immigrant will not have any idea what was happening since everyone was speaking English at the time.
They are also an important tool for journalists to be able to obtain information and proof for stories about the government. News organizations often use FOIA for reporting purposes, but such requests still only make up less than 10% of all FOIA requests.
For more information about the Freedom of Information Act or to learn how to file a FOIA request see our FOIA page or our How-To FOIA Guide.
If you submit a FOIA request by regular mail, which is still an option despite USCIS hiding all information about how to do so on their website, then USCIS send the following email once they receive the request sent by mail (copied and pasted from my email including the typo in USCIS’ automated email):
Hello,
You recently requested information from us under the Freedom of Information Act (FOIA).
In response to COVID-19, we must temporarily reduce our capacity for processing paper FOIA requests and delivering records by mail.
We strongly recommend that you https://first.uscis.gov to receive a faster response and to help keep our workforce safe.
Step 1: Create a USCIS account to receive information online
Visit the USCIS online account page at https://first.uscis.gov, and click “Create an Account”.
Set up your email address login, two-step verification, and the security question answers.
Once you have fully logged in, select FIRST to find your FOIA request.
Step 2: Link Your Request to Your Online Account
After you login, click the “View My Requests” button.
A message will appear, asking if you have a new request to register. Click “Yes”.
Enter the FOIA control number and PIN we mailed to you and click the “Register Case” button.
Success! You will see your request on the “My Requests” page in your account.
Step 3: Use the My Requests Page
Now you can check the My Requests page to see the status of your request.
We will notify you by email to check this page when the information you requested is ready.
Once we post the information here, you can view or download anytime.
Thanks for helping us provide you with a more efficient service!
USCIS
If you have troubles logging into your account, please call the USCIS Contact Center toll-free at 800-375-5283. For people who are deaf, hard of hearing or have a speech disability: TTY 800-767-1833.
THIS RESPONSE HAS BEEN AUTO GENERATED. PLEASE DO NOT REPLY TO THIS MESSAGE.
Temporary Protected Status Extension and Redesignation for Ukraine
On Aug. 18, 2023, Secretary of Homeland Security Alejandro Mayorkas announced the extension and redesignation of Ukraine for TPS for 18 months. The extension of TPS for Ukraine allows current beneficiaries to retain TPS through April 19, 2025, if they meet eligibility requirements. Existing beneficiaries of TPS for Ukraine seeking to avoid gaps in their employment authorization documentation may re-register during the 60-day re-registration period which runs from Aug. 21, 2023, through Oct. 20, 2023. The redesignation allows Ukrainian nationals (and individuals having no nationality who last habitually resided in Ukraine) who have continuously resided in the United States since Aug. 16, 2023, and have been continuously physically present in the United States since Oct. 20, 2023, to file initial applications for TPS, if they are otherwise eligible.
USCIS his conducting a public engagement on Temporary Protected Status Extension and Redesignation for Ukraine on Tuesday, October, 3rd at 2-3pm EST. You can find more information about the engagement here.
DHS Extends TPS Re-registration Periods for El Salvador, Haiti, Honduras, Nepal, Nicaragua and Sudan to 18 Months
The Department of Homeland Security (DHS) is extending from 60 days to 18 months the periods to re-register for Temporary Protected Status (TPS) under the designations of El Salvador, Haiti, Honduras, Nepal, Nicaragua and Sudan.
The 18-month re-registration period under the designation of:
TPS beneficiaries under the El Salvador designation may continue to re-register after the Sept. 10, 2023, expiration date noted in the June 21, 2023, Federal Register notice.
TPS beneficiaries under the Haiti designation may continue to re-register after the March 27, 2023, expiration date noted in the Jan. 26, 2023, Federal Register notice.
TPS beneficiaries under the Sudan designation may continue to re-register after the Oct. 20, 2023, expiration date noted in the Aug. 21, 2023, Federal Register notice.
For up-to-date information, please check the TPS webpage or call the USCIS TPS Hotline at 202-272-1533. (Please note that this is not a toll-free number.)
WHAT ARE THE REQUIREMENTS FOR THE “PASSPORT STYLE PHOTOGRAPHS” THAT USCIS REQUIRES WITH CERTAIN APPLICATIONS AND VISA PETITIONS?
USCIS requires that you provide photographs of yourself with your visa petition or with certain immigration benefit applications (asylum, adjustment of status, employment authorization, and others). Below are USCIS’ requirements for the “passport-style photographs” that must be sent with petitions/applications that require photos. These photos are required for the DV lottery (diversity visa lottery), Adjustment of Status (green card) Application, all visa applications, U.S. passports, and other immigration benefits.
There are actually a surprising number of memos, directives, and other guidance from USCIS and the U.S. Department of State detailing strict requirements for these photos even though they don’t explain it at all anywhere in the form instructions or on their website. The State Department even offers an online tool for cropping your passport style photos at https://tsg.phototool.state.gov/photo. They have specific instructions for infants as well.
According to the guidelines from the State Department:
Your photos must be
In color
2″x 2″ Two inch by two inch in size
Sized such that the head is between 1 inch and 1 3/8 inches (22 mm and 35 mm) or 50% and 69% of the image’s total height from the bottom of the chin to the top of the head. View the Photo Composition Template for more size requirement details.
Taken within the last 6 months to reflect your current appearance
Taken in front of a plain white or off-white background
Taken in full-face view directly facing the camera
With a neutral facial expression and both eyes open
Taken in clothing that you normally wear on a daily basis
Uniforms should not be worn in your photo, except religious clothing that is worn daily.
Do not wear a hat or head covering that obscures the hair or hairline, unless worn daily for a religious purpose. Your full face must be visible, and the head covering must not cast any shadows on your face.
Headphones, wireless hands-free devices, or similar items are not acceptable in your photo.
Eyeglasses are no longer allowed in new visa photos, except in rare circumstances when eyeglasses cannot be removed for medical reasons; e.g., the applicant has recently had ocular surgery and the eyeglasses are necessary to protect the applicant’s eyes. A medical statement signed by a medical professional/health practitioner must be provided in these cases. If the eyeglasses are accepted for medical reasons:
The frames of the eyeglasses must not cover the eye(s).
There must not be glare on eyeglasses that obscures the eye(s).
There must not be shadows or refraction from the eyeglasses that obscures the eye(s).
If you normally wear a hearing device or similar articles, they may be worn in your photo.
Snapshots, magazine photos, low quality vending machine or mobile phone photos, and full-length photographs are not acceptable.
You can go to most chain drug stores and get these photos done in five minutes for about ten dollars, which is what I would recommend doing. There are also many professional services that offer various systems for doing these for you. Finally, more and more people are starting to just do it themselves which is why the State Department created a tool to help people with that.
For all the details about the requirements for photographs submitted with visa petitions and application for immigration benefits see our Immigration Benefit/Visa Petition Photo Page on the topic.
HOW TO SUBMIT THE REQUIRED PHOTOGRAPH OF YOURSELF TO IMMIGRATION WITH YOUR APPLICATION OR PETITION
You can read all the boring details here otherwise see the important highlights below.
The U.S. Government provides this photo tool free of charge. You can take the photo of yourself and then upload your photo and use the tool to crop and resize your image to the proper dimensions (600x600px).
TIPS FOR TAKING YOUR OWN PHOTO
You should be able to see some of the white background above the top of your head down to just above your chest
have someone else take the photo don’t try to submit a selfie
Head is in the center of the frame
solid white background
stand 3-6 feet away from the white wall and avoid using flash so you don’t cast a shadow on the wall behind you
Keep a neutral face expression looking at the camera straight on
Don’t wear glasses or a hat or any sort of uniform
Use the DOS photo tool (https://tsg.phototool.state.gov/photo)to upload the photo straight from your phone and crop it to exactly 600×600 pixels (minimum resolution required)
You don’t need to use a ruler and measure out the exact dimensions-just make your photo look like the examples.
You can find templates for cropping and printing your photo for USCIS on our immigration photo requirements page along with more examples and information.